Quantcast
Channel: Fix my IT system
Viewing all 61 articles
Browse latest View live

Manage Windows Network Bandwidth with native QOS

$
0
0
By default Windows process will use as much of the network as it can to complete a task as fast as possible. This is great when there is only one thing happening at a time.  If however you have a server that is handling different workloads you might want to prevent once kind of traffic from hogging all of the bandwidth and starving the others.

As an example we have a single server that hosts a HTTP site and a File Share.  When files are not being copied form the file share the Web site is responsive and works well.  When someone copies content from the file share the Web site performance deteriorates.   I ideally we want to prevent this from happening.

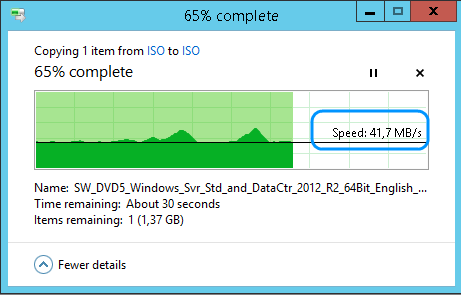
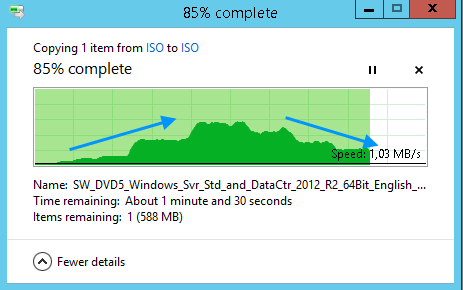
Lets look at the transfer rate and therefore network usage of the file copy


On this network, the speed at which the file can be copied is around 40MB/s

If we want to slow down the file copy to consume less bandwidth we can make us of the native Windows QOS Packet Scheduler.  The Quality Of Service scheduler allows us to prioritize  and limit traffic to ensure that one process does not starve another.

QOS functionality is covered by policies.  these policies  mostly lives on the group policy.  You can make QOS policy change in the group policy directly or through PowerShell using the NetQosPolicy noun

Step 1 - Check for existing policies
First up check if there are any existing policies that could conflict or override your intended policy.
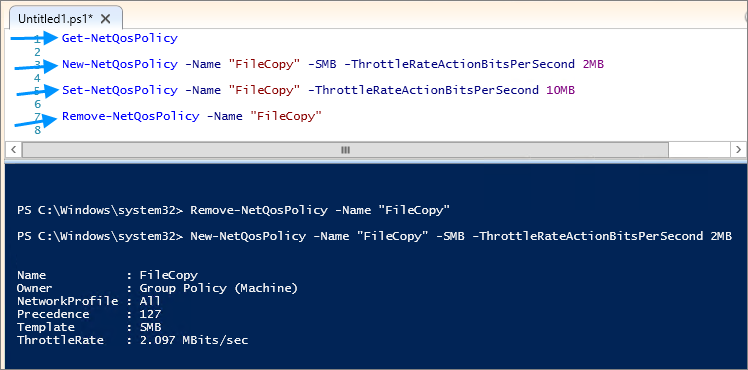
Get-NetQosPolicy


Step 2 - Create a new policy
Next up we are going to create a new Policy  that applies to SMB traffic and we are going the throttle or limit the throughput to 2MB/s.

New-NetQosPolicy -Name "FileCopy" -SMB -ThrottleRateActionBitsPerSecond 2MB

At this stage we can start a file copy and see that the network usage is much lower.  

Step 3 - Adjust an existing policy
Once nice ting about QOS policies are that they apply almost immediately without any need for restarting a process or rebooting.
You can now adjust the limit with.

Set-NetQosPolicy -Name "FileCopy" -ThrottleRateActionBitsPerSecond 10MB


I ran this with a few different values and you can tell form the "steps" when they started and stopped.  You can increase or decrease the values, there is not restriction on it from that perspective.


Step 4 - Removing rules (optional)
Ultimately if you are done you can simply remove the policy with

Remove-NetQosPolicy -Name "FileCopy"

You can confirm that there are no policies left by running

Get-NetQosPolicy


Summary 
The one limitation.to be aware of when starting out is that QOS only applies to OUTBOUND traffic.  Any file copy to the server would still consume the full network that is available.

Before you start looking for other tools to help shape your network traffic, look at what is possible with Windows QOS.  This barely scratches the surface but it shows just how easy and effective it can be.  For more information check out http://technet.microsoft.com/en-us/library/hh967469.aspx


Use PowerShell to conditionally add VM's to a VMM cloud

$
0
0
I've had a few instanced where I needed to add a whole bunch of existing VM's to an existing cloud in SCVMM.  I wanted to only add the machines where the VM name matched a certain naming convention.

The easiest way to do this was to pipe the details together PowerShell

Set the Variable to the Cloud's Name - in this case "Service Management"

$Cloud = Get-SCCloud -VMMServer scvmmc01.fixmyitsystem.com | where {$_.Name -eq "Service Management"}

I wanted to add all the machine that contained "CAA" in the machine name

Check that the correct list of VM's will be added

Get-SCVirtualMachine -VMMServer scvmmc01.fixmyitsystem.com | where {$_.Name -Match "CAA"} | select name

Once I was happy, the command pipe below added the machines to the cloud

Get-SCVirtualMachine -VMMServer scvmmc01.fixmyitsystem.com | where {$_.Name -Match "CAA"} | ForEach-Object {Set-SCVirtualMachine -VM $_.Name  -Cloud $Cloud }


You can use this method to use any of the virtual machine properties and you can use any of the conditional operators. As an example you could add all machines where the owner is someone, or even move all machines from one cloud to another.

Some of the VM Properties:

Accessibility
AddedTime
BackupEnabled
CapabilityProfile
CapabilityProfileCompatibilityState
Cloud
CloudId
CloudVmRoleId
CloudVmRoleName
ClusterNonPossibleOwner
ClusterPreferredOwner
ComputerName
ComputerNameString
ComputerTier
ConnectToAddresses
CostCenter
CPUCount
CreationSource
CustomProperties
CustomProperty
Description
Generation
HasSavedState
HasSharedStorage
HasVirtualFibreChannelAdapters
HasVMAdditions
HAVMPriority
HostId
HostName
HostType
ID

To get a full list of the available properties you can use

Get-SCVirtualMachine |gm

The compare or evaluate the property to your query you can use the Conditional Operators

 -eq             Equal
 -ne             Not equal
 -ge             Greater than or equal
 -gt             Greater than
 -lt             Less than
 -le             Less than or equal
 -like           Wildcard comparison
 -notlike        Wildcard comparison
 -match          Regular expression comparison
 -notmatch       Regular expression comparison
 -replace        Replace operator
 -contains       Containment operator
 -notcontains    Containment operator


Resolution for Error (2927) in SCVMM 2012 R2 when creating a clone

$
0
0
Had this issue on a environment where everything was working perfectly other than creating a clone.


Error (2927)
A Hardware Management error has occurred trying to contact server HYPERV03.domain.com  .

WinRM: URL: [http://hyperv03.woolworths.co.za:5985], Verb: [INVOKE], Method: [FilteredHardDriveScout], Resource: [http://schemas.microsoft.com/wbem/wsman/1/wmi/root/scvmm/P2VServerJob]

Unknown error (0x80338043)

Recommended Action
Check that WinRM is installed and running on server HYPERV03.woolworths.co.za. For more information use the command "winrm helpmsg hresult" and http://support.microsoft.com/kb/2742275 .


The Fix for this was to restart the System Centre Virtual Machine manager Agent on the Hyper-V Host.

Ref: http://blogs.technet.com/b/scvmm/archive/2012/12/13/vmm-support-tip-adding-hosts-fails-with-error-2927.aspx

Move SCVMM 2012 R2 Cluster database form one SQL server to another

$
0
0
The only time you can specify your database is during installation.  From then on it is not changeable.  When you have System Center Virtual Machine Manager 2012 R2 configured as a failover cluster things get even more complicated.

There are two common strategies for moving the database. That do not really work for clusters.

The one is changing the registry information regarding the database location. Unfortunately, in a cluster environment those keys are restored when the node is elected.

The second approach is to uninstall VMM while retaining the database and then re-installing and specifying the existing database.  Once again, in a cluster environment you would have to systematically remove all the nodes till the last one, "move the database",and then re-install every node.

 
The only effective way I managed to do this is to forgo the idea of changing the database location in SCVMM.  Instead use a SQL Alias to mask the database move.

Step 1 Get the existing configuration
Open the VMM console
Select Setting
Open Database Connection

From here you can see the current configuration.  It is important to note here that this will not be changed.  It will remain the same.


Step 2 Backup and restore / move the database
Open fail over cluster manager
Stop the SCVMM cluster role.
Start you backup on the existing SQL
Restore your backup on the new SQL

Step 3 Create the alias
Ttart c:\Windows\System32\Cliconfg.exe
Select the Alias tab
Click the Add button
In the server alias specify the current database instance name from Step 1
In the servername specify the new servername and instance
The Pipe name should be auto completed.


Note : This step needs to be completed on each cluster node.  If not the nodes will be pointing to two different databases.

Step 4 Start the SCVMM cluster role
Open fail over cluster manager
Start the SCVMM cluster role.


At this point you should be able to take the old database offline.  I would suggest proper testing to make sure all the nodes are connecting correctly to the new database before permanently removing the old one.


Hyper-V Cluster to Cluster replication

$
0
0
Hyper-V replication is a great feature that is normally associate with Disaster Recovery (DR)  It is also widely employed as an alternative to having a fail-over cluster.  The thinking being that you have a warm backup of the machine only a few seconds behind the live server, effectively giving you a more current "backup."

In this article I am going to cover configuring replication form one cluster to another.  As you will see there are a few additional consideration and advantages compared to stand alone servers.

What can replicate to what
Replication is very versatile on that you can configure replication between the following:

  • Host to Host
  • HA Cluster VM to Host
  • Host to HA Cluster VM
  • HA Cluster VM to HA Cluster VM
You cannot replicate the following:
  • You have the limitation of not being able to replicate a cluster vm that is not HA.
  • You cannot replicate within the same cluster.  


Thy Hyper-V Replica Broker
Because virtual machine can move between hosts in a cluster environment you need the replica broker to ensure that the replication remains intact regardless of the host changes.


  • From the Server manager
  • Open Fail-over cluster manager and connect to the cluster
  • Select the Roles node
  • Click Configure Role
  • Select Hyper-V Replica Broker
  • Specify the Client Access Point - this is and additional name and IP that will be used be the cluster
  • Complete the wizard


Repeat for the second cluster

Configuring Replication
By default replication is not enabled. you need to turn it on for the cluster.


  • From the fail-over cluster manager 
  • Select the Hyper-V Replica Broker and right click
  • Select Replication settings
  • Check the "Enable the Cluster as a replica server
  • Check "Use Kerberos" for Authentication
  • Select allow replication from any authenticated server
  • Specify a default location to store the files. This should be on one of the CSV volumes.
  • OK


You will be notified to allow inbound firewall rules for the replication.
This has to be enabled on  each cluster node.  The easiest way of doing it is with a power shell command
Simply specify the clusternodes

Invoke-Command -computer hyperv06,hyperv07,hyperv08 {Enable-NetFirewallRule -Displaygroup "Hyper-V Replica HTTP"}

Set up replication for a virtual machine
Replication is a per-vm configuration so each one need to be specified


  • From the fail-over cluster manager 
  • Select the roles node
  • Select the virtual machine you would like to replicate and right click
  • Select Replication > Enable replication
  • Instead of specifying a replica server or cluster you need to specify the Replica Broker you created earlier
  • The connection parameters should all be detected correctly
  • Choose the replica VHDs
  • Configure the replication frequency (30 seconds, 5 minutes or 15 minutes)
  • Specify additional recovery points (governed by backup frequency)
  • Specify Initial replication. Select network unless it is not suitable.


The initial replication is when the build of the data will be transferred everything all subsequent replication is only the delta and is generally speaking relatively small.


  • Unless it is not suitable select Start Replication Immediately
  • Finish the wizard


Checking in on your replica
You can now check the Replica status by selecting the virtual machine and expanding the properties windows below


You can also view replica status form within System Center Virtual Machine Manager (SCVMM)  You can enable two additional columns.  Replication Status and Health.  It will also change the icon of the secondary or replica server.


Migrating the replica source
The virtual machine can be migrated between hosts in the same cluster without breaking replication.

This is done through the fail-over cluster manager.


  • Select Roles
  • Select the VM
  • Move - Live Migration - Select Node
  • Wait for the migration to complete


If you check the replication details you will notice that the current primary server has changed.

This can also be done from withing SCVMM


  • Open the cluster
  • Select the VM that is the replication source
  • Right Click - Migrate


You will see that only the current host has a PRO start rating.  the other cluster nodes have none.  The Rating Explanation is:

The virtual machine ... which requires Hyper-V Recovery Manager protection is going to be moved using type "Live". This could break the recovery protection status of the virtual machine.


  • This can be ignored by clicking Next


This migration happens as expected and the replication partner still remains intact.


Migrating the replica destination
Some times you might want to leave the replica source where it is and simply change the node to which it is replicated.  The process is exactly the same as above except the steps are performed on the replica rather than the source.

Migrating into and out of a fail-over cluster
When you enable replication between a cluster and a stand alone host some changes are assumed and made on your behalf.

When an HA VM is replicated to a standalone server it is automatically converted to being a normal non HA VM.

The opposite happens when replicating into a cluster.  The VM is configured as an HA VM with all it's bits stored in the shared storage.


Hyper-V and SCVMM Powershell Cheat Sheet

$
0
0
PowerShell integration with both native Hyper-V management and extended through VMM is great.  It can be a real time shaver as long as you don't have to figure out or stick together all the PowerShell commands.
I found the best way of work to simply be opening the PowerShell ISE and run and edit the commands from there.   This article will be updated as and when I find useful commands.

Network Enhancements

Disable VMQ on multiple hosts

This is a handy command to disable VMQ for the VM data network adapters or teams.  This prevents VMQ driver issues from impacting VM network performance.  I found it only worked successfully if you disable the NICs AND the team.

Invoke-Command -ComputerName Hyperv06,Hyperv07,Hyperv08,Hyperv09,Hyperv10,Hyperv11,Hyperv12,Hyperv13 -ScriptBlock {disable-NetAdapterVmq "NIC6 ", "NIC7", "VM-Traffic-Team"}

Dynamic Memory
Dynamic memory is a great way to increase the VM density on a host.  It is also a primary target for trying to troubleshoot performance issues per VM

Get a list of Virtual machines and memory information

Get-SCVirtualMachine | select Name,DynamicMemoryEnabled, Memory, DynamicMemoryMinimumMB , DynamicMemoryMaximumMB , DynamicMemoryDemandMB, DynamicMemoryBufferPercentage |Sort-Object name |Format-Table -AutoSize

Get a list of virtual machines that do not have dynamic memory enabled

Get-SCVirtualMachine | where {$_.DynamicMemoryEnabled -eq $false} | Sort-Object name| select Name,DynamicMemoryEnabled, Memory, DynamicMemoryMinimumMB , DynamicMemoryMaximumMB , DynamicMemoryDemandMB, DynamicMemoryBufferPercentage  |Format-Table -AutoSize

To change a VM from static to dynamic memory.  Just specify the name and the memory values

$vm = Get-SCVirtualMachine -Name Win2012r2Stop-SCVirtualMachine -VM $vm -ShutdownSet-SCVirtualMachine -VM $vm -DynamicMemoryEnabled $True -DynamicMemoryBufferPercentage 40 -DynamicMemoryMaximumMB 8192 -DynamicMemoryMinimumMB 1024 -MemoryMB 4096Start-SCVirtualMachine -VM $vmGet-SCVirtualMachine -Name $vm | select Name,DynamicMemoryEnabled, Memory, DynamicMemoryMinimumMB , DynamicMemoryMaximumMB , DynamicMemoryDemandMB, DynamicMemoryBufferPercentage |Sort-Object name |Format-Table -AutoSize


Automating VM moves between stand alone hosts
When dealing with non clustered hosts you can make use of the share nothing live migration feature to essentially give you a similar experience to HA vm during things like host patching.  This typically invloves three steps.  The first step is to drain all the VM from the first host, path and reboot the host.  Second step is to move all the VM's to the second host and the path and reboot the first host.  Third step is to load balance across the server by splitting the amount of vm tio be equal on each host.

Step one and two would use this command but just reversing the order of the hosts.

Get-SCVirtualMachine -VMHost hyperv02 | Move-SCVirtualMachine -VMHost hyperv01 -HighlyAvailable $false -UseLAN -UseDiffDiskOptimization -Path "D:\vmstorage" -RunAsynchronously


Step three moves half of the VMs from one host to another.

$amount = Get-SCVirtualMachine -VMHost hyperv01 $unit = $amount.Count$half = $unit / 2$vmnames = Get-SCVirtualMachine -VMHost hyperv01 |select name -First $half
$vmnames | ForEach-Object {Move-SCVirtualMachine -VM $_.name -VMHost hyperv02 -HighlyAvailable $false -UseLAN -UseDiffDiskOptimization -Path "D:\vmstorage" } 
Host reboot
When you have a non HA host, VMs will not automatically be moved to another host when the host is shut down or rebooted.  The action that the VM will take is determined by the stat-up setting on the VM itself.

To check the current settings for all the VMs on a host use

Get-SCVirtualMachine -VMHost hyperv03 |select name, stopaction, startaction


The most seamless way of getting a VM to return, is the save the state and to resume the VM

Get-SCVirtualMachine -VMHost hyperv03 | Set-SCVirtualMachine -StartAction TurnOnVMIfRunningWhenVSStopped -StopAction SaveVM

The only problem with this is that to perform the save state the RAM is commited to a file written to the same location as the hot's default VM path.  If there is a constraint there you will have failures during host shutdown.

Certain machines should also not be saved as it could cause issues. an example of this would be a domain controller.

To shut down the machines and start them up again use the following.

Get-SCVirtualMachine -VMHost hyperv03 | Set-SCVirtualMachine -StartAction TurnOnVMIfRunningWhenVSStopped -StopAction ShutdownGuestOS

This will also trigger certain non Microsoft VMs to shut down.

z

Everything you should know about Hyper-V CSV Cache setup, monitoring and performance

$
0
0
Cluster Shared Volume Cache or CSV cache is as the name implies a cache for CSVs. Very simply put, it allocates a portion of the host's RAM to act as a block level read cache for the VHDs that reside on the CSV.  This translates into significant improvement in read I/O performance, which in turn leads to overall performance improvement.

The cache to cluster to host to VM to CSV relationship
To understand the actual working of this relationship I had to spend a fair amount of time with a fairly large cluster running multiple virtual machines on a number of  CSV volumes.

Cache to cluster
The CSV cache setting is a cluster wide setting and is integrated into the failover clustering feature.  What this means is that you only need to set the cache value on a single node and it will apply across all of the members.

Cache to CSV
The cache setting is applied per CSV volume.  So if you have a 1GB cache allocated that 1GB will potentially be multiplied by the number of CSVs.

Host to VM
Cache will only be provisioned by a host for a CSV on which it is the current owner of a VM running on that CSV

So by now you would have figured out that this gets a little complicated.

Here are a few examples to help explain the concept.

In a hypothetical example imagine a three node cluster with three CSVs and 9 running VMs. and the CSV cache is set to 1GB

In the first scenario imagine that the environment is perfectly balanced where each node runs three VM each VM is on a different CSV.

On a host level this means 1GB can be allocated to each CSV = 3GB per host = 9GB for the cluster - simple

In the next example imagine that each node only has VMs running on one CSV.  Keep in mind that RAM is only allocated to cache for an active CSV

On the host only 1 CSV is active so it is 1GB RAM x 1 = 1GB per host = 3GB for the cluster


In the third example, imagine that 6 VMs are not equally distributed on single host across three active CSVs.

So the host allocates 1GB per Active CSV = 3GB

  • On CSV 1 only 1 VM is running so it has 1GB of cache available to it.
  • On CSV 2 two VMs are running so it has 1GB of cache available so it is split in two so only 512MB per VM
  • On CSV 3 three VMs are running and the 1GB of cache is split 3 ways so only 341MB per VM


In reality cache is dynamically allocated and moved between the VMs based on their activity but this should illustrate the concept.


Monitoring performance on the host
When deciding how much RAM to allocate to cache you need to consider the "worst case scenario" where that amount is multiplied for each CSV.  Setting that amount too high could potentially starve the hosts and therefore VMs of RAM.  Setting it unnecessarily low would limit the potential performance benefit.

To see what is actually going you need to have a look at Performance Monitor


The counters are under Cluster CSV Volume Cache

  • Cache state will tell you if CSV is enable for that volume
  • The Cache size counters shows the maximum configured and the actual used.
  • Cache IO counters refers to  IO that is satisfied from cache
  • Disk IO counters refer to IO that has to be satisfied form disk and not cache


When we look at this across an entire cluster the picture becomes more clear.


  • If you look at HYPERV03 (Green) you see that only volume5 is active - that is because I only have 1 VM on that hosts and that vm is running on volume5


  • If you look at HYPERV04 Volume2 (Amber) you see that all the IO Read/Sec is satisfied from cache


  • If you look at HYPERV04 Volume4 (Blue) you see that all the IO Read/Sec is satisfied from disk


  • If you look at HYPERV05 volume 4 (Purple) you can see that IO Reads are split between cache and disk


Measuring performance in the VM
For this test I use a simple utility called ATTO Disk Benchmark http://www.attotech.com/disk-benchmark/ It provides a quick non invasive way to check your disk performance.  When looking at the images pay attention to the Transfer Rate in MB / Sec number at the bottom of the image.

In test scenario 1 the test VM is on HYPERV03 volume 5 so it has all the case available to it. So here we would see the absolute best case scenario.


In test scenario 2 the same test VM is moved to HYPERV05 where there is a fair amount for contention so this would be a real world typical example


In test scenario 3 the same test VM is moved back to HYPERV03 so it has the best possible resource available but this time I basically turned the CSV cache off by setting it ridiculously low to "16MB".


What we can see from this is that with CSV cache enabled you get a performance boot on read even on a busy CSV.  Even on a busy CSV it outperforms a dedicated non cached CSV.


How Much cache should be allocated
This is a sticky question because the answer is a very non specific answer of "it depends." By default CSV cache is enable with 512MB of RAM allocated.  I have run the tests above a number of time with various amounts of cache configured.  What the results show is that if the cache gets exhausted the performance drops off. but while it is able to satisfy the IO requirement the same level of performance is realised regardless of the amount allocated.

What it comes down to is how well you know your environment.  If you have very few CSV in a cluster you can allocate a larger amount.  When you have more CSVs you need to keep in mind the multiplying effect of this and accordingly reduce the amount of cache.

Recommendation from Microsoft is a minimum of 512MB and no more than 64GB

Other factors to consider
The CSV cache can you you a very nice read IO performance increase but it is far from being the only performance factor.  The shared storage type, speed and contention also plays a significant role.

Write heavy VM will not benefit much from cache but read  heave ones would.

VM storage placement and host allocation can have a significant impact.

Enabling and adjusting the CSV cache.
This first became available in 2008R2 but was not enabled by default. By 2012 R2 it is and has a default allocation of 512MB.

Your CSV volumes MUST be formatted with NTFS.  If you use ReFS you will not be able to use CSV Cahe.

To adjust the amount of cache allocated you use the following PowerShell command.  Remembering it only needs to be done once on a single node it the cluster.

(Get-Cluster). BlockCacheSize = 1024

The number being the amount of MB

You can change this number on the fly and no reboot or anything like that is required.

Conclusion
CSV Cache is a great technique for improving performance of Hyper-V VMs.  Understanding how it works and why it works allows you to tune this feature to your environment to get the best benefit.


How to Fix Remote Desktop Gateway WMI failure Unable to Update Local Resource Group

$
0
0
When attempting to add another machine to a local computer group you receiver the following error:

    WMI failure Unable to Update Local Resource Group


This only happen when you click Apply or OK.  You can specify the computer name and click add and that works fine, it adds it to the list, but it wont apply the change.

Adding the same machine to a new group or another group works fine.

You may have notices that there is some validation that happens.  If you attempt to add a a computer that does not have a corresponding DNS entry it will generate the following error:

   The IP address lookup failed for <servername> Ensure that you have typed the name or IP    address of the computer correctly.

When attempting to add a new machiene the new entry is verified and the error is generated, but whne you click on Apply or OK, a validation process runs through all the other computer names in that group.  If a server listed there no longer exist and therefore the DNS check fails you will see the WMI error.

So the fix is simple.  Remove the computers that no longer have a corresponding DNS entry.  Once the list is now valid it will allow you to add the new machines.


If you have a big local computer group, it might be easier just to work through the list of computers by looking at the exported XML configuration.

Do do this simple select the Gateway in the MMC - Right Click - Export policy and configuration settings.

This generates an XML file you can easily work with. BUT - DO NOT edit the file - it will fail an import validation check and probably break the Resource Authorisation Policies.


Automate the Delete or Purge of old files using a simple script

$
0
0
If you have ever had the need to automate deleting of files older than a certain amount of days, this will help you out.

As an example IIS has a few logging options but unfortunately there is no way to purge off old records.
This script can be scheduled as a Windows Task and take care of that for you.

Just Specify the folder and the DateDiff
Save the files as logpurge.vbs
And specify that to run in Windows Task Scheduler
Set filesys = CreateObject("Scripting.FileSystemObject")
Set Directory = filesys.GetFolder("D:\LogFiles\IIS\W3SVC1")
Set Files = Directory.Files
For Each Modified in Files
If DateDiff("m", Modified.DateLastModified, Now) > 1 Then modified.delete
Next

The "m" refers to month, you can also specify week, day, year etc.

http://www.w3schools.com/vbscript/func_datediff.asp


SCVMM Manually remove orphaned hosts and clusters

$
0
0
Unfortunately it has happened to me on more than one occasion where VMM gets stuck with orphaned hosts and or clusters that you simple cannot delete.

Error Messages to correspond to this is:

Error (20400)
2 parallel subtasks failed during execution.

Error (2605)
Unable to connect to the VMM database because of a general database failure.
SQL error code: 547


To resolve this problem you are going to have to go into the VMM database and manually pick the orphaned object out.  Please note that this is a last resort option. please Ensure you have a fresh backup of the VMM database before you proceed.

Step 1 Get the host GUID

The host ID is the GUID that is required.  The easiest way to do this is the PowerShell the following (hyperv18 being the problem)

get-scvmhost -ComputerName hyperv18 | select id, name

This will return something like:

f072a82f-278f-4810-80ba-7d58c5eec29d   hyperv18.fixmyitsystem.com


Step 2 Run SQL Script
You will now need to stop the VMM Service so it releases the database

Specify the VMM Database name and specify the GUID.  Execute the script and start the VMM service again.  The objects should be gone now.

If it is a cluster you need to specify all of the orphaned hosts stuck in the cluster. When the last host is remove the cluster itself will also be removed.


USE VMMDB01;

DECLARE @DeleteHostId GUID;
SET @DeleteHostId = 'f072a82f-278f-4810-80ba-7d58c5eec29d '

PRINT N'Deleting host with GUID ' + RTRIM(CAST(@DeleteHostID AS nvarchar(50)))

PRINT N'Getting host cluster GUID'

DECLARE @HostClusterID GUID;
SET @HostClusterID =
(
SELECT HostClusterID FROM [dbo].[tbl_ADHC_Host]
WHERE HostID = @DeleteHostId
)

IF (@HostClusterID IS NOT NULL)
PRINT N'Retreived host cluster GUID ' + RTRIM(CAST(@HostClusterID AS nvarchar(50)))
ELSE
PRINT N'This host does not belong to a cluster'

PRINT N'Deleteing physical objects'

DELETE FROM [dbo].[tbl_WLC_PhysicalObject]
WHERE HostId = @DeleteHostId

PRINT N'Deleteing virtual objects'

DELETE FROM [dbo].[tbl_WLC_VObject]
WHERE HostId = @DeleteHostId

PRINT N'Prepairing to delete host network adapters'

DECLARE @HostNetworkAdapterCursor CURSOR;
DECLARE @HostNetworkAdapterID GUID;
SET @HostNetworkAdapterCursor = CURSOR FOR
(SELECT NetworkAdapterID FROM [dbo].[tbl_ADHC_HostNetworkAdapter])

OPEN @HostNetworkAdapterCursor

FETCH NEXT FROM @HostNetworkAdapterCursor INTO @HostNetworkAdapterID

WHILE (@@FETCH_STATUS = 0)
BEGIN
PRINT N'Prepairing to delete host network adapter with GUID ' + RTRIM(CAST(@HostNetworkAdapterID AS nvarchar(50)))

PRINT N'Deleting logical network mapping for host network adapter with GUID ' + RTRIM(CAST(@HostNetworkAdapterID AS nvarchar(50)))

DELETE FROM [dbo].[tbl_NetMan_HostNetworkAdapterToLogicalNetwork]
WHERE HostNetworkAdapterID = @HostNetworkAdapterID

PRINT N'Deleting IP subnet VLAN mapping for host network adapter with GUID ' + RTRIM(CAST(@HostNetworkAdapterID AS nvarchar(50)))

DELETE FROM [dbo].[tbl_NetMan_HostNetworkAdapterToIPSubnetVLan]
WHERE HostNetworkAdapterID = @HostNetworkAdapterID

FETCH NEXT FROM @HostNetworkAdapterCursor INTO @HostNetworkAdapterID
END

CLOSE @HostNetworkAdapterCursor
DEALLOCATE @HostNetworkAdapterCursor

PRINT N'Completing host network adapters deletion'

DELETE FROM [dbo].[tbl_ADHC_HostNetworkAdapter]
WHERE HostID = @DeleteHostId

PRINT N'Deleting virtual networks'

DELETE FROM [dbo].[tbl_ADHC_VirtualNetwork]
WHERE HostID = @DeleteHostId

PRINT N'Deleting virtual switch extensions'

DELETE FROM [dbo].[tbl_NetMan_InstalledVirtualSwitchExtension]
WHERE HostID = @DeleteHostId

PRINT N'Deleting host volumes'

DELETE FROM [dbo].[tbl_ADHC_HostVolume]
WHERE HostID = @DeleteHostId

PRINT N'Deleting pass through disks'

DELETE FROM [dbo].[tbl_WLC_VDrive]
WHERE HostDiskId IN (SELECT DiskID FROM [dbo].[tbl_ADHC_HostDisk] WHERE HostID IN (SELECT HostID FROM [dbo].[tbl_ADHC_Host] WHERE HostID = @DeleteHostId))

PRINT N'Deleting host disks'

DELETE FROM [dbo].[tbl_ADHC_HostDisk]
WHERE HostID = @DeleteHostId

PRINT N'Prepairing to delete host bus adapters'

DECLARE @HostBusAdapterCursor CURSOR;
DECLARE @HostBusAdapterID GUID;
SET @HostBusAdapterCursor = CURSOR FOR
(SELECT HbaID FROM [dbo].[tbl_ADHC_HostBusAdapter])

OPEN @HostBusAdapterCursor

FETCH NEXT FROM @HostBusAdapterCursor INTO @HostBusAdapterID

WHILE (@@FETCH_STATUS = 0)
BEGIN

PRINT N'Prepairing to delete host bus adapter with GUID ' + RTRIM(CAST(@HostBusAdapterID AS nvarchar(50)))

PRINT N'Deleting fiber port mapping for host bus adapter with GUID ' + RTRIM(CAST(@HostBusAdapterID AS nvarchar(50)))

DECLARE @FiberPortID GUID;
SET @FiberPortID =
(
SELECT PortID FROM [dbo].[tbl_ADHC_FCHbaToFibrePortMapping]
WHERE FCHbaID = @HostBusAdapterID
)

DELETE FROM [dbo].[tbl_ADHC_FCHbaToFibrePortMapping]
WHERE FCHbaID = @HostBusAdapterID

PRINT N'Deleting fiber port with GUID ' + RTRIM(CAST(@FiberPortID AS nvarchar(50)))

DELETE FROM [dbo].[tbl_ADHC_FibrePort]
WHERE PortID = @FiberPortID

PRINT N'Deleting fiber channel mapping for host bus adapter with GUID ' + RTRIM(CAST(@HostBusAdapterID AS nvarchar(50)))

DELETE FROM [dbo].[tbl_ADHC_HostFibreChannelHba]
WHERE FCHbaID = @HostBusAdapterID

PRINT N'Deleting any iSCSI entries for host bus adapter with GUID ' + RTRIM(CAST(@HostBusAdapterID AS nvarchar(50)))

DECLARE @iSCSITargets TABLE
(
TargetID GUID
)
INSERT INTO @iSCSITargets (TargetID)
SELECT TargetID FROM [dbo].[tbl_ADHC_ISCSIHbaToTargetMapping]
WHERE ISCSIHbaID = @HostBusAdapterID

PRINT N'Deleting iSCSI host bus adapter to target mapping for mapping for host bus adapter with GUID ' + RTRIM(CAST(@HostBusAdapterID AS nvarchar(50)))

DELETE FROM [dbo].[tbl_ADHC_ISCSIHbaToTargetMapping]
WHERE ISCSIHbaID = @HostBusAdapterID

PRINT N'Deleting iSCSI host bus adapter with GUID ' + RTRIM(CAST(@HostBusAdapterID AS nvarchar(50)))

DELETE FROM [dbo].[tbl_ADHC_HostInternetSCSIHba]
WHERE ISCSIHbaID = @HostBusAdapterID

PRINT N'Deleting iSCSI targets for host bus adapter with GUID ' + RTRIM(CAST(@HostBusAdapterID AS nvarchar(50)))

DECLARE @iSCSITargetIDCursor CURSOR;
DECLARE @iSCSITargetID GUID;
SET @iSCSITargetIDCursor = CURSOR FOR
(SELECT TargetID FROM @iSCSITargets)

OPEN @iSCSITargetIDCursor

FETCH NEXT FROM @iSCSITargetIDCursor INTO @iSCSITargetID

WHILE (@@FETCH_STATUS = 0)
BEGIN

PRINT N'Deleting iSCSI targets with GUID ' + RTRIM(CAST(@iSCSITargetID AS nvarchar(50)))

DELETE FROM [dbo].[tbl_ADHC_ISCSITarget]
WHERE TargetID = @iSCSITargetID

FETCH NEXT FROM @iSCSITargetIDCursor INTO @iSCSITargetID
END

CLOSE @iSCSITargetIDCursor
DEALLOCATE @iSCSITargetIDCursor

FETCH NEXT FROM @HostBusAdapterCursor INTO @HostBusAdapterID
END

CLOSE @HostBusAdapterCursor
DEALLOCATE @HostBusAdapterCursor

PRINT N'Completing host bus adapters deletion'

DELETE FROM [dbo].[tbl_ADHC_HostBusAdapter]
WHERE HostID = @DeleteHostId

PRINT N'Prepairing to delete agent servers'

DECLARE @AgentServerID  GUID;
SET @AgentServerID =
(
SELECT AgentServerID FROM [dbo].[tbl_ADHC_AgentServerRelation]
WHERE HostLibraryServerID = @DeleteHostID
)

PRINT N'Deleting agent server relations'

DELETE FROM [dbo].[tbl_ADHC_AgentServerRelation]
WHERE HostLibraryServerID = @DeleteHostID

PRINT N'Deleting health monitor data for agent server with GUID ' + RTRIM(CAST(@AgentServerID AS nvarchar(50)))

DELETE FROM [dbo].[tbl_ADHC_HealthMonitor]
WHERE AgentServerID = @AgentServerID

PRINT N'Deleting agent server with GUID ' + RTRIM(CAST(@AgentServerID AS nvarchar(50)))

DELETE FROM [dbo].[tbl_ADHC_AgentServer]
WHERE AgentServerID = @AgentServerID

PRINT N'Deleting host GPUs'

DELETE FROM [dbo].[tbl_ADHC_HostGPU]
WHERE HostID = @DeleteHostId

PRINT N'Deleting host'

DELETE FROM [dbo].[tbl_ADHC_Host]
WHERE HostID = @DeleteHostId

IF (@HostClusterID IS NOT NULL)
BEGIN

PRINT N'Checking to see if any other hosts are joined to the same cluster'

DECLARE @HostCount INT;
SET @HostCount =
(
SELECT COUNT(*) FROM [dbo].[tbl_ADHC_Host]
WHERE HostClusterID = @HostClusterID
)

PRINT N'There are ' + RTRIM(CAST(@HostCount AS nvarchar(50))) + N' currently joined to the same cluster'

IF (@HostCount = 0)
BEGIN

PRINT N'Deleting cluster disks'

DELETE FROM [dbo].[tbl_ADHC_ClusterDisk]
WHERE ClusterID = @HostClusterID

PRINT N'Deleting cluster'

DELETE FROM [dbo].[tbl_ADHC_HostCluster]
WHERE ClusterID = @HostClusterID
END
ELSE
PRINT N'This host is not the last host in the cluster, the cluster will be deleted upon the deletion of the last host.'
END
ELSE
PRINT N'This host does not belong to a cluster, no clusters will be deleted'

GO


Script originally from http://helshabini.wordpress.com/2011/11/14/manually-remove-hyper-v-host-cluster-from-scvmm-2012-database/


SSL Certificate pfx to pem conversion with OpenSSL

$
0
0
OpenSSL is a tool used to manipulate SSL certificates. It also has the ability to extract and convert certificates between the various certificate formats that are required for various systems.

This tutorial will cover converting a PFX that contains the certificate chain into a plain text consolidated pem file for import into a WebLogic server.


openssl pkcs12 -in MyCert.pfx -out Mycert.pem

this will then ask for the import password that you specified during export
you will then be asked for a phassphrase
you will have to confirm the passphrase

The resultant file contains the extended properties and the various companents in the following order

Privatekey
Server Certificate
Root Certificate Authority
Intermediate Certificate Authority

Weblogic requires the pem file to be in the following order without any of the exterded properties

Privatekey
Server Certificate
Intermediate Certificate Authority
Root Certificate Authority

To do this we simple edit the pem file in a text editor

The various certificate elements are delimited as follows  

-----BEGIN RSA PRIVATE KEY-----
-----END RSA PRIVATE KEY-----
-----BEGIN CERTIFICATE-----
-----END CERTIFICATE-----

The export would look like this

Bag Attributes
    Microsoft Local Key set: <No Values>
    localKeyID: 01 00 00 00 
    friendlyName: le-734abccd-41eb-4767-8413-bb71a89936ff
    Microsoft CSP Name: Microsoft RSA SChannel Cryptographic Provider
Key Attributes
    X509v3 Key Usage: 10 
-----BEGIN RSA PRIVATE KEY-----
Proc-Type: 4,ENCRYPTED
DEK-Info: DES-EDE3-CBC,BE2FBBD6CCFE6

3NrzDbQJjulQcMG6z9SHm4gEColMcXymYJJOcuUwELrFDzGImlF/uKXeaTjonk5z
1ECPImFEK2SwedgQ5bI+4zRBudw6sOnCMLSEdBZUFTPKaWikMTcO86QNoVL+Regf
HNMm3Xnyi0rOdyQYrCY0d1Qz3VmRpJmGt/7Sk4lLH2FamRLXFDQtImSEtq3L4HrB
2636Q2D+/sgtQSPpJV+M06eUpmJwkBk9Pf2794WGznxencYSgGIk5hYx5tfQJue6
n9cLD3sIrtKwhzwEnSDZu3NREKqmqRkyd4r+z60UhrJNRcQRSUvh71n7Y/w5+z04
-----END RSA PRIVATE KEY-----
Bag Attributes
    localKeyID: 01 00 00 00 
    1.3.6.1.4.1.311.17.3.92: 00 08 00 00 
    1.3.6.1.4.1.311.17.3.20: FF 07 5C 24 46 71 0D 5E 17 C5 1C C0 B5 93 8E D6 A0 57 80 9E 

    1.3.6.1.4.1.311.17.3.71: 54 00 4D 00 47 00 30 00 38 00 2E 00 77 00 6F 00 6F 00 6C 00 77 00 6F 00 72 00 74 00 68 00 73 00 2E 00 63 00 6F 00 2E 00 7A 00 61 00 00 00 
    1.3.6.1.4.1.311.17.3.75: 44 00 30 00 31 00 39 00 37 00 43 00 44 00 31 00 32 00 33 00 31 00 32 00 39 00 41 00 36 00 44 00 34 00 36 00 36 00 43 00 35 00 46 00 30 00 46 00 43 00 31 00 35 00 38 00 34 00 45 00 41 00 32 00 5F 00 00 00 
subject=/C=ZA/L=Cape Town/O=Wool (Pty) Ltd/CN=psnet.domain.co.za
issuer=/C=US/O=Entrust, Inc./OU=www.entrust.net/rpa is incorporated by reference/OU=(c) 2009 Entrust, Inc./CN=Entrust Certification Authority - L1C
-----BEGIN CERTIFICATE-----
MIIFGDCCBACgAwIBAgIETCR4XzANBgkqhkiG9w0BAQUFADCBsTELMAkGA1UEBhMC
VVMxFjAUBgNVBAoTDUVudHJ1c3QsIEluYy4xOTA3BgNVBAsTMHd3dy5lbnRydXN0
Lm5ldC9ycGEgaXMgaW5jb3Jwb3JhdGVkIGJ5IHJlZmVyZW5jZTEfMB0GA1UECxMW
cNk2pVK9lJzwU2WwmXfFWW3jNrAE/3OpVAsi6/45ZNLPsiD20Qpk6mZ3oY/5McLz
fDm5EzHNd8yXBZoEIZRKJpL4bmZl87TEEK8st38pDXZ1UhC+2OI355yqz2UmPW+S
c2MH1JAnaLSZxM80oOxBPIejTUiDqZ3ak5LmSR0vfjNGTpM/DFpevQ5izSoKVQRG
jzyKUQB6H/yI9zMb
-----END CERTIFICATE-----

Delete all of the extended attribute text leaving only the certificate hash between delimiters.  You should end up with the following:

-----BEGIN RSA PRIVATE KEY-----
3NrzDbQJjulQcMG6z9SHm4gEColMcXymYJJOcuUwELrFDzGImlF/uKXeaTjonk5z
1ECPImFEK2SwedgQ5bI+4zRBudw6sOnCMLSEdBZUFTPKaWikMTcO86QNoVL+Regf
HNMm3Xnyi0rOdyQYrCY0d1Qz3VmRpJmGt/7Sk4lLH2FamRLXFDQtImSEtq3L4HrB
/FwgoJHiSVb30nyVzVwpP49WDXOYJk1eXvTVEVHCUwH65Xjx78J6kex8OBryKnuh
2636Q2D+/sgtQSPpJV+M06eUpmJwkBk9Pf2794WGznxencYSgGIk5hYx5tfQJue6
n9cLD3sIrtKwhzwEnSDZu3NREKqmqRkyd4r+z60UhrJNRcQRSUvh71n7Y/w5+z04
-----END RSA PRIVATE KEY-----
-----BEGIN CERTIFICATE-----
MIIFGDCCBACgAwIBAgIETCR4XzANBgkqhkiG9w0BAQUFADCBsTELMAkGA1UEBhMC
VVMxFjAUBgNVBAoTDUVudHJ1c3QsIEluYy4xOTA3BgNVBAsTMHd3dy5lbnRydXN0
E5/k2t9zC4exvIYDn0hGDlX4rtBDcL5GIYri3x+vCtz7EvISjzbPuJ5PmDttdwXX
ZYwTsWxRmSAzrQIDAQABo4IBhTCCAYEwCwYDVR0PBAQDAgWgMB0GA1UdJQQWMBQG
CCsGAQUFBwMBBggrBgEFBQcDAjAzBgNVHR8ELDAqMCigJqAkhiJodHRwOi8vY3Js
LmVudHJ1c3QubmV0L2xldmVsMWMuY3JsMGQGCCsGAQUFBwEBBFgwVjAjBggrBgEF
BQcwAYYXaHR0cDovL29jc3AuZW50cnVzdC5uZXQwLwYIKwYBBQUHMAKGI2h0dHA6
Ly9haWEuZW50cnVzdC5uZXQvMjA0OC1sMWMuY2VyMEoGA1UdIARDMEEwNQYJKoZI
hvZ9B0sCMCgwJgYIKwYBBQUHAgEWGmh0dHA6Ly93d3cuZW50cnVzdC5uZXQvcnBh
MAgGBmeBDAECAjAhBgNVHREEGjAYghZwc29mdC53b29sd29ydGhzLmNvLnphMB8G
A1UdIwQYMBaAFB7xq4kG+EkPATN37hR67hl8kyhNMB0GA1UdDgQWBBT/B1wkRnEN
XhfFHMC1k47WoFeAnjAJBgNVHRMEAjAAMA0GCSqGSIb3DQEBBQUAA4IBAQCB8kP1
0Xrtf7DFKvSSMl7mu909AfSlohJ02CYfjDszHEKBLS9cjKeHg/tP78qfSYpXD5sN
EUPtYFLTQ4RRqpOfm5BzS0QDDTRijySl8hKjQP8PmIAYdZe9VZvV8y5H2FK6cQWE
cNk2pVK9lJzwU2WwmXfFWW3jNrAE/3OpVAsi6/45ZNLPsiD20Qpk6mZ3oY/5McLz
fDm5EzHNd8yXBZoEIZRKJpL4bmZl87TEEK8st38pDXZ1UhC+2OI355yqz2UmPW+S
c2MH1JAnaLSZxM80oOxBPIejTUiDqZ3ak5LmSR0vfjNGTpM/DFpevQ5izSoKVQRG
jzyKUQB6H/yI9zMb
-----END CERTIFICATE-----
-----BEGIN CERTIFICATE-----
MIIEKjCCAxKgAwIBAgIEOGPe+DANBgkqhkiG9w0BAQUFADCBtDEUMBIGA1UEChML
RW50cnVzdC5uZXQxQDA+BgNVBAsUN3d3dy5lbnRydXN0Lm5ldC9DUFNfMjA0OCBp
bmNvcnAuIGJ5IHJlZi4gKGxpbWl0cyBsaWFiLikxJTAjBgNVBAsTHChjKSAxOTk5
U8aAghOY+rat2l098c5u9hURlIIM7j+VrxGrD9cv3h8Dj1csHsm7mhpElesYT6Yf
zX1XEC+bBAlahLVu2B064dae0Wx5XnkcFMXj0EyTO2U87d89vqbllRrDtRnDvV5b
u/8j72gZyxKTJ1wDLW8w0B62GqzeWvfRqqgnpv55gcR5mTNXuhKwqeBCbJPKVt7+
bYQLCIt+jerXmCHG8+c8eS9enNFMFY3h7CI3zJpDC5fcgJCNs2ebb0gIFVbPv/Er
fF6adulZkMV8gzURZVE=
-----END CERTIFICATE-----
-----BEGIN CERTIFICATE-----
MIIE8jCCA9qgAwIBAgIEOGPp/DANBgkqhkiG9w0BAQUFADCBtDEUMBIGA1UEChML
d3cuZW50cnVzdC5uZXQvcnBhMB0GA1UdDgQWBBQe8auJBvhJDwEzd+4Ueu4ZfJMo
TTAfBgNVHSMEGDAWgBRV5IHREYC+2Im5CKMx+aEkCRa5cDANBgkqhkiG9w0BAQUF
AAOCAQEAB/ZfgoR/gEDHkDRGQiQDzi+ruoOeJXMN7awFacaH7aNc8lfBsUl2mk3y
P93kDv4LPrmY2TKVHTL0Ae6cyMjlP+BTdmL83attPZSQ8sCzPJgnNl4olyL8G0DT
Kw2ttVdt3w/jS+9zAhBl+hvQrDHV4w/oujIwg+5K0L/fIpB6vuw6G8RJBB3xroB3
PEII26c7KKaAAQPmOaPr34BZG/MsvtxyRHmgbAelbU1EjkJoypR8Lja6hZ7NqsRe
PFS+/i/qaZ0cHimbltjI/lGQ8SSmkAaz8Cmi/3gud1xFIdlEADHzvjJP9QoyDfz8
uhZ2VrLWSJLyi6Y+t6xcaeoLP2ZFuQ==
-----END CERTIFICATE-----

The only thing left to do now is to swap around the last two certificates and you are set.  Save the file as consolidated.pem and import that into Weblogic


It may also be required to have a separate .pem that only contain the certs and .key file that only contains the private key. To get this you would follow a similar process.

Extract the pfx to pem exclusing the certs

openssl pkcs12 -in certname.pfx -nocerts -out key.pem -nodes

Extract the pfx to pem excluding the key

 penssl pkcs12 -in certname.pfx -nokeys -out cert.pem

Convert the key pem to a .key file

openssl rsa -in key.pem -out server.key 


Change host access account for a cluster in SCVMM

$
0
0
The host access account is the one used by VMM to communicate with the hosts.  This can normally easily be changed using the hosts's properties.

If however the host is a cluster member the  host Access Run as account is greyed out, more specifically the Browse button that would allow you to select another run as account.


You can check which hosts are using a particular run as account by selecting it form the
Settings | Security |Run as accounts | Properties | Consumers

To change the host access acount we are goign to need to head over to PowerShell

You need to confirm the clustername and Run As names before you start. you can get those with

Get-SCVMHostCluster

Get-SCRunAsAccount

Once you have that simply run the following

$YourCluster = Get-SCVMHostCluster -Name clustername
$YourRunAs = Get-SCRunAsAccount -Name "runasaccoutname"
Set-SCVmHostCluster -VMHostCluster $YourCluster -VMHostManagementCredential $YourRunAs

After the script has run you can verify thing through the VMM console again.


Originally posted as a solution by M.Oberg

SCVMM console takes forever to open : Fixed

$
0
0
I had a problem when launching the SCVMM console, I would get the log in prompt fast enough but it would then just sit there for about 5 minutes before it would actually open up.  From that point on everything worked perfectly fine again.

Turn out the problem was because the SCOM ( System Center Operations Manager) server had gone offline.

You can confirm that this is the same problem by looking at Settings | System Centre Settings | Operations Manager Server


If you attempt to make a change to any of these settings it will again bog down for a few minutes not doing anything. but then it will give you the solution.


Run the following from PowerShell as an admin

Remove-SCOpsMgrConnection -force

The defunct SCOM server is removed and then you are free to add a new one in again.


Remove a VMhost from SCVMM when all else fails

$
0
0
Occasionally you will get stuck with an VMhost that you cannot remove from VMM

Your first call would be do run power shell and attempt

Remove-SCVMHost -VMHost stuckHVhost -force

If this also fails you will have to go edit the database directly.  Make sure you have a backup of your database in case something goes horribly pear-shape.

Before you start make sure you get the host ID by running

get-scvmhost -ComputerName stuckHVhost | select id, name

Stop the VMM service and open up your SQL management studio and start a new query on the VMM database

All you need to set is @deletehostid ( second line)

DECLARE @DeleteHostId GUID;
SET @DeleteHostId = ''

PRINT N'Deleting host with GUID ' + RTRIM(CAST(@DeleteHostID AS nvarchar(50)))

PRINT N'Getting host cluster GUID'

DECLARE @HostClusterID GUID;
SET @HostClusterID =
(
SELECT HostClusterID FROM [dbo].[tbl_ADHC_Host]
WHERE HostID = @DeleteHostId
)

IF (@HostClusterID IS NOT NULL)
PRINT N'Retreived host cluster GUID ' + RTRIM(CAST(@HostClusterID AS nvarchar(50)))
ELSE
PRINT N'This host does not belong to a cluster'

PRINT N'Deleteing physical objects'

DELETE FROM [dbo].[tbl_WLC_PhysicalObject]
WHERE HostId = @DeleteHostId

PRINT N'Deleteing virtual objects'

DELETE FROM [dbo].[tbl_WLC_VObject]
WHERE HostId = @DeleteHostId

PRINT N'Prepairing to delete host network adapters'

DECLARE @HostNetworkAdapterCursor CURSOR;
DECLARE @HostNetworkAdapterID GUID;
SET @HostNetworkAdapterCursor = CURSOR FOR
(SELECT NetworkAdapterID FROM [dbo].[tbl_ADHC_HostNetworkAdapter])

OPEN @HostNetworkAdapterCursor

FETCH NEXT FROM @HostNetworkAdapterCursor INTO @HostNetworkAdapterID

WHILE (@@FETCH_STATUS = 0)
BEGIN
PRINT N'Prepairing to delete host network adapter with GUID ' + RTRIM(CAST(@HostNetworkAdapterID AS nvarchar(50)))

PRINT N'Deleting logical network mapping for host network adapter with GUID ' + RTRIM(CAST(@HostNetworkAdapterID AS nvarchar(50)))

DELETE FROM [dbo].[tbl_NetMan_HostNetworkAdapterToLogicalNetwork]
WHERE HostNetworkAdapterID = @HostNetworkAdapterID

PRINT N'Deleting IP subnet VLAN mapping for host network adapter with GUID ' + RTRIM(CAST(@HostNetworkAdapterID AS nvarchar(50)))

DELETE FROM [dbo].[tbl_NetMan_HostNetworkAdapterToIPSubnetVLan]
WHERE HostNetworkAdapterID = @HostNetworkAdapterID

FETCH NEXT FROM @HostNetworkAdapterCursor INTO @HostNetworkAdapterID
END

CLOSE @HostNetworkAdapterCursor
DEALLOCATE @HostNetworkAdapterCursor

PRINT N'Completing host network adapters deletion'

DELETE FROM [dbo].[tbl_ADHC_HostNetworkAdapter]
WHERE HostID = @DeleteHostId

PRINT N'Deleting virtual networks'

DELETE FROM [dbo].[tbl_ADHC_VirtualNetwork]
WHERE HostID = @DeleteHostId

PRINT N'Deleting virtual switch extensions'

DELETE FROM [dbo].[tbl_NetMan_InstalledVirtualSwitchExtension]
WHERE HostID = @DeleteHostId

PRINT N'Deleting host volumes'

DELETE FROM [dbo].[tbl_ADHC_HostVolume]
WHERE HostID = @DeleteHostId

PRINT N'Deleting pass through disks'

DELETE FROM [dbo].[tbl_WLC_VDrive]
WHERE HostDiskId IN (SELECT DiskID FROM [dbo].[tbl_ADHC_HostDisk] WHERE HostID IN (SELECT HostID FROM [dbo].[tbl_ADHC_Host] WHERE HostID = @DeleteHostId))

PRINT N'Deleting host disks'

DELETE FROM [dbo].[tbl_ADHC_HostDisk]
WHERE HostID = @DeleteHostId

PRINT N'Prepairing to delete host bus adapters'

DECLARE @HostBusAdapterCursor CURSOR;
DECLARE @HostBusAdapterID GUID;
SET @HostBusAdapterCursor = CURSOR FOR
(SELECT HbaID FROM [dbo].[tbl_ADHC_HostBusAdapter])

OPEN @HostBusAdapterCursor

FETCH NEXT FROM @HostBusAdapterCursor INTO @HostBusAdapterID

WHILE (@@FETCH_STATUS = 0)
BEGIN

PRINT N'Prepairing to delete host bus adapter with GUID ' + RTRIM(CAST(@HostBusAdapterID AS nvarchar(50)))

PRINT N'Deleting fiber port mapping for host bus adapter with GUID ' + RTRIM(CAST(@HostBusAdapterID AS nvarchar(50)))

DECLARE @FiberPortID GUID;
SET @FiberPortID =
(
SELECT PortID FROM [dbo].[tbl_ADHC_FCHbaToFibrePortMapping]
WHERE FCHbaID = @HostBusAdapterID
)

DELETE FROM [dbo].[tbl_ADHC_FCHbaToFibrePortMapping]
WHERE FCHbaID = @HostBusAdapterID

PRINT N'Deleting fiber port with GUID ' + RTRIM(CAST(@FiberPortID AS nvarchar(50)))

DELETE FROM [dbo].[tbl_ADHC_FibrePort]
WHERE PortID = @FiberPortID

PRINT N'Deleting fiber channel mapping for host bus adapter with GUID ' + RTRIM(CAST(@HostBusAdapterID AS nvarchar(50)))

DELETE FROM [dbo].[tbl_ADHC_HostFibreChannelHba]
WHERE FCHbaID = @HostBusAdapterID

PRINT N'Deleting any iSCSI entries for host bus adapter with GUID ' + RTRIM(CAST(@HostBusAdapterID AS nvarchar(50)))

DECLARE @iSCSITargets TABLE
(
TargetID GUID
)
INSERT INTO @iSCSITargets (TargetID)
SELECT TargetID FROM [dbo].[tbl_ADHC_ISCSIHbaToTargetMapping]
WHERE ISCSIHbaID = @HostBusAdapterID

PRINT N'Deleting iSCSI host bus adapter to target mapping for mapping for host bus adapter with GUID ' + RTRIM(CAST(@HostBusAdapterID AS nvarchar(50)))

DELETE FROM [dbo].[tbl_ADHC_ISCSIHbaToTargetMapping]
WHERE ISCSIHbaID = @HostBusAdapterID

PRINT N'Deleting iSCSI host bus adapter with GUID ' + RTRIM(CAST(@HostBusAdapterID AS nvarchar(50)))

DELETE FROM [dbo].[tbl_ADHC_HostInternetSCSIHba]
WHERE ISCSIHbaID = @HostBusAdapterID

PRINT N'Deleting iSCSI targets for host bus adapter with GUID ' + RTRIM(CAST(@HostBusAdapterID AS nvarchar(50)))

DECLARE @iSCSITargetIDCursor CURSOR;
DECLARE @iSCSITargetID GUID;
SET @iSCSITargetIDCursor = CURSOR FOR
(SELECT TargetID FROM @iSCSITargets)

OPEN @iSCSITargetIDCursor

FETCH NEXT FROM @iSCSITargetIDCursor INTO @iSCSITargetID

WHILE (@@FETCH_STATUS = 0)
BEGIN

PRINT N'Deleting iSCSI targets with GUID ' + RTRIM(CAST(@iSCSITargetID AS nvarchar(50)))

DELETE FROM [dbo].[tbl_ADHC_ISCSITarget]
WHERE TargetID = @iSCSITargetID

FETCH NEXT FROM @iSCSITargetIDCursor INTO @iSCSITargetID
END

CLOSE @iSCSITargetIDCursor
DEALLOCATE @iSCSITargetIDCursor

FETCH NEXT FROM @HostBusAdapterCursor INTO @HostBusAdapterID
END

CLOSE @HostBusAdapterCursor
DEALLOCATE @HostBusAdapterCursor

PRINT N'Completing host bus adapters deletion'

DELETE FROM [dbo].[tbl_ADHC_HostBusAdapter]
WHERE HostID = @DeleteHostId

PRINT N'Prepairing to delete agent servers'

DECLARE @AgentServerID  GUID;
SET @AgentServerID =
(
SELECT AgentServerID FROM [dbo].[tbl_ADHC_AgentServerRelation]
WHERE HostLibraryServerID = @DeleteHostID
)

PRINT N'Deleting agent server relations'

DELETE FROM [dbo].[tbl_ADHC_AgentServerRelation]
WHERE HostLibraryServerID = @DeleteHostID

PRINT N'Deleting health monitor data for agent server with GUID ' + RTRIM(CAST(@AgentServerID AS nvarchar(50)))

DELETE FROM [dbo].[tbl_ADHC_HealthMonitor]
WHERE AgentServerID = @AgentServerID

PRINT N'Deleting agent server with GUID ' + RTRIM(CAST(@AgentServerID AS nvarchar(50)))

DELETE FROM [dbo].[tbl_ADHC_AgentServer]
WHERE AgentServerID = @AgentServerID

PRINT N'Deleting host GPUs'

DELETE FROM [dbo].[tbl_ADHC_HostGPU]
WHERE HostID = @DeleteHostId

PRINT N'Deleting host'

DELETE FROM [dbo].[tbl_ADHC_Host]
WHERE HostID = @DeleteHostId

IF (@HostClusterID IS NOT NULL)
BEGIN

PRINT N'Checking to see if any other hosts are joined to the same cluster'

DECLARE @HostCount INT;
SET @HostCount =
(
SELECT COUNT(*) FROM [dbo].[tbl_ADHC_Host]
WHERE HostClusterID = @HostClusterID
)

PRINT N'There are ' + RTRIM(CAST(@HostCount AS nvarchar(50))) + N' currently joined to the same cluster'

IF (@HostCount = 0)
BEGIN

PRINT N'Deleting cluster disks'

DELETE FROM [dbo].[tbl_ADHC_ClusterDisk]
WHERE ClusterID = @HostClusterID

PRINT N'Deleting cluster'

DELETE FROM [dbo].[tbl_ADHC_HostCluster]
WHERE ClusterID = @HostClusterID
END
ELSE
PRINT N'This host is not the last host in the cluster, the cluster will be deleted upon the deletion of the last host.'
END
ELSE
PRINT N'This host does not belong to a cluster, no clusters will be deleted'

GO


After the script completes you should be able to start up the VMM service again and the stubborn host should be gone.

SCVMM - Change the display name of a VmHoSt to fix capitalisation

$
0
0
A Personal per peeve is when you are looking at your beautiful VMM console and all of your hosts line up perfectly except one, someone added it with the host name specified in the wrong CASE.  You cannot fix this be renaming the host or anything else you might try - yes I tried a few ways.

The only way to fix it is to edit the database directly

Here is my crude but effective query


update dbo.tbl_ADHC_Host
set ComputerName = REPLACE(ComputerName, 'hyperv10.ww.co.za', 'HYPERV10.ww.co.za')
where ComputerName = 'hyperv10.ww.co.za'

select * from dbo.tbl_ADHC_Host


VMM Powershell Assign Logical Network to VMhost adapters

$
0
0
One step that cannot easily be automated to multiple hosts is assigning the logical network a VM host has been grated access to to a physical adapter on the host.  The following PowerShell allows you to set this.


$logicalNetwork = Get-SCLogicalNetwork -Name"Virtual Machine VLANS"
$vmHostNetworkAdapter = Get-SCVMHostNetworkAdapter -VMHost hyperv02 | where {$_.ConnectionName -eq "VM Traffic"
Set-SCVMHostNetworkAdapter -VMHostNetworkAdapter $vmHostNetworkAdapter -AddOrSetLogicalNetwork $logicalNetwork

You can also string this together for multiple network on host group members

You can get the group names with

Get-VMHostGroup | select path | Sort-Object path

And the logical network names with

get-sclogicalnetwork | select name | Sort-Object name

This will give you what you need to complete the $netlist and $members sections


$netlist ="Hyper-V Management","Virtual Machine VLANS", "Core Infrastructure VLANS","F5 VLANS"

foreach($net in $netlist)
{
$logicalNetwork = Get-SCLogicalNetwork -Name $net
    $members = Get-VMHost | where {$_.VMHostGroup -like "All Hosts\DC2 Data Center\Best - HA EMC"}
    foreach ($M IN $members)
    {
    $vmHostNetworkAdapter = Get-SCVMHostNetworkAdapter -VMHost $m.Name | where {$_.ConnectionName -eq "VM Traffic"
    Set-SCVMHostNetworkAdapter -VMHostNetworkAdapter $vmHostNetworkAdapter -AddOrSetLogicalNetwork $logicalNetwork
    }

}


Find duplicate VMs in your SCVMM environement

$
0
0
Sometimes there is a reason for legitimately having duplicate VM names that would not cause a problem at all.  If you have a replicated VM you would have two, one on the other off.

You could also have a VM stored in the library that is the same name as a server that is currently deployed.

Then there are the duplicate VMs that your really want to find and get rid of.  These can be cause by a number of factors, most of them human.

To track down duplicates use the following

Get-SCVirtualMachine | group -Property name |? {$_.Count -gt 1} | % {$_.Group} | Select-Object Name,virtualmachinestate,IsPrimaryVM, IsRecoveryVM,ID  ,hostname,HostGrouppath  | Format-Table -AutoSize

It will give you an output similar to this


The green machines are an actual replicated pair and is not a problem.
The amber machines is a duplicate we would like to get rid of.

The command will also give you the unique ID.  You can remove the unwanted duplicate using the following

Get-SCVirtualMachine -ID "****copyfromoutput****" | Remove-SCVirtualMachine -Force

Retrive Hyper-V host details from within the VM

$
0
0
Normally it is not hard to keep track of where your VMs are running.   After all there are numerous consoles and tools to use during the various stages or environments a VM can be in.

If however you find yourself with a VM that is on the network and you cannot track down the host that owns it you can get some of the host information from the VM providing the guest services are installed and running

The Registry key that maintains this information in the VM is

HKLM:\SOFTWARE\Microsoft\Virtual Machine\Guest\Parameters

"HostName"="Hypervman0"
"HostingSystemEditionId"=dword:00000007
"HostingSystemOsMajor"=dword:00000006
"HostingSystemOsMinor"=dword:00000003
"HostingSystemProcessorArchitecture"=dword:00000009
"HostingSystemSpMajor"=dword:00000000
"HostingSystemSpMinor"=dword:00000000
"PhysicalHostName"="HYPERVMAN0"
"PhysicalHostNameFullyQualified"="Hypervman0.domain.co.za"
"VirtualMachineId"="CA0BDECF-2DDB-4388-A6B8-BACED5283354"
"VirtualMachineName"="VMname"

You can retrieve this info from  the registry or run the following PowerShell just to return the name

(Get-ItemProperty –path "HKLM:\SOFTWARE\Microsoft\Virtual Machine\Guest\Parameters").PhysicalHostName

Mac OSX Auto proxy configuration from the shell

$
0
0
If you are usinf a Mac and you are jumping between multiple proxy these commands may come in handy to switch various proxy setting on and off.

You can of course go in via the Setting GUI, but trust me, after a while it gets a bit old.

The two setting you will most likely want to turn on and off are


  • Auto Proxy Discovery
  • AutoMatic Proxy Configuration


You may also want to explicitly define the two below but auto is where you should be as ti configure a lot of stuff for you including exclusions.


  • Web (HTTP)
  • Secure Web Proxy (HTTPS)


Before you can specify any commands you need to know which network interface or network service you need to use.  To get the list run


sudo networksetup -listallnetworkservices

AutoProxy Discovery 

sudo networksetup -setproxyautodiscovery "Thunderbolt Ethernet" on

or

sudo networksetup -setproxyautodiscovery "Thunderbolt Ethernet" off


Automatic Proxy Configuration

Enable it

sudo networksetup -setautoproxystate "Thunderbolt Ethernet" on

Disable it

sudo networksetup -setautoproxystate "Thunderbolt Ethernet" on


Configure the URL

sudo networksetup -setautoproxyurl "Thunderbolt Ethernet""http://utm02.domain.co.za:8080/wpad.dat"

Blank it 

sudo networksetup -setautoproxyurl "Thunderbolt Ethernet"""


To manually specify the proxy

sudo networksetup -setwebproxy "Thunderbolt Ethernet""webproxy" 8080 

with authentication

sudo networksetup -setwebproxy "Thunderbolt Ethernet""webproxy" 8080 on username password


set the bypass or exclusions


sudo networksetup -setproxybypassdomains  "Thunderbolt Ethernet""*.mydomain""*.otherdomain""10.0.0.0/8"


F5 GTM Zone Transfer Files

$
0
0
If you need to manually export a zone for some or other purpose you can simply grab the files form the GTM directly.


The zone files are located in

/var/named/config/namedb

The files are named as follows

db.external.domain.domain.

You can check the content of the file with nano or vi or you can SCP the file locally and save it there.


Viewing all 61 articles
Browse latest View live